ZBrush modeling

3D sculpt inspired by mixed martial arts.

Space Switching Video Series

A video series explaining the concept and scripting a tool to setup and interact with space switching setup for rigs.

Rigid Bodies Simulation

Small project with simulated rigid bodies and nParticle effects.

Maya Muscle Tutorial

A tutorial on using the spline deformer on custom geometry to create muscle flexing and stretching behavior.

Saturday, June 22, 2013

Spidey Rig 1.0 project - Joint Layout

This is a cartoon rig Im designing that will soon be available for download. It will be a robust, flexible and animator friendly rig for easy and intuitive interaction. Ill be posting notes and studies for different features that will be included in the rig. Here is the joint layout for the basic hierarchy and rotation order plan.


Thanks!

Wednesday, June 19, 2013

Creating Stretchy IK Joint Chain

I thought it would be nice to go over how to create a basic yet so important setup in character rigging. The concept itself is quite simple, yet I've seen many times people struggle with the idea. So in this post I'll go over how to setup a stretchy joint chain being driven by an Ik solver using code. The code itself will be generating utility nodes and hooking things up for us to make the setup work.

If you want you can download a tool that uses this technique here

Watch instructional video here

From this hopefully you'll be able to use the information to create your own version of this setup. So lets get to it. We will be using the python maya.cmds package
import maya.cmds as cmds
For us to setup a stretchy joint chain, first we will require some joints.
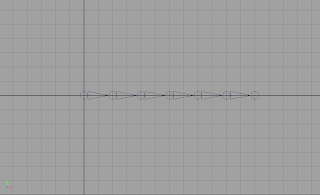
Joint Chain
Once the joints have been created all we really need is to specify what is the start and end of our stretchy joint chain. With a start and end joint we can go ahead an create a new Ik handle. For this demonstration we will use a single chain solver (SC). So lets define a method that takes in a start and an end joint. Lets also go ahead and also rename and store the new nodes created with the Ik handle so we can keep track of them.

def stretchyIKChain(startJoint, endJoint):
    ikNodes = cmds.ikHandle(sj=startJoint, ee=endJoint, solver="ikSCsolver", n=startJoint + "_ikHandle")
    ikNodes[1] = cmds.rename(ikNodes[1], startJoint + "_effector")
    ikHandle = ikNodes[0]

If we were to describe the process of making this joint chain stretch uniformly, we would say that we want each individual 'bone' to stretch by the same factor. That stretch factor would be the current length divided by the original length. So right from the start we already know we need a way to measure the length  from our start joint to the end joint. Thankfully we have something called the 'distance tool'. In maya, it is located under Create -> Measure Tools -> Distance Tool. We want to create a distance node measuring form the start joint to the end joint. The tool will create a locator at each end. So to do this in our code we will create locators and hook it up ourselves.

    # create locators for distance tool node
    startLocator = cmds.spaceLocator(n=startJoint + "_startLocator")[0]
    cmds.pointConstraint(startJoint, startLocator, mo=False, n=startLocator + "_pointConstraint")

    endLocator = cmds.spaceLocator(n=endJoint + "_endLocator")[0]
    cmds.xform(endLocator, ws=True, absolute=True, translation=cmds.xform(ikHandle, q=True, ws=True, translation=True))
    cmds.pointConstraint(endLocator, ikHandle, mo=False, n=ikHandle + "_pointConstraint")
    
    distanceNode = cmds.createNode("distanceDimShape", n="%s_%s_distance" % (startLocator,endLocator))
    
    cmds.connectAttr(startLocator + "Shape.worldPosition[0]", distanceNode + ".startPoint")
    cmds.connectAttr(endLocator + "Shape.worldPosition[0]", distanceNode + ".endPoint")
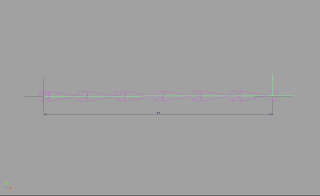
Ik Joint Chain distanc
The point constraint will serve 2 purposes. With 'maintainoffset' set to False it will snap the locator to the position we want, and now the start locator will follow the start joint. For the end locator we first move it to the end joints positions, where the ikHandle is, and point constraint the ikHandle to the locator. This way, you can organize the nodes and put the ikHandle in other group and just work with the locator. The locator will be your control for the stretchy ikHandle, you can parent it or constraint it to another control curve if would like to. Next, we hook up the locator to the distance node through their worldPosition attribute.

I mentioned we will be dividing the current length by the original length. The distance node provides with current distance between the locators, and because we have hooked up the locators to our ik joints, it will update correctly. However, we need to get the original length of the joint chain. We could just get the distance value right now, but what if the joint chain was laid out straight like we did it here. What if it was something like this
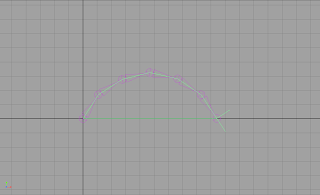
Non-straight Joint chain
Then the default distance doesn't actually represent the length of the joint chain. If we move the ikHandle so that the joints are lined up straight, we will then have the actual original length. Its from this point on that we want the joints to start stretching. But we won't do it this way.

One solution could be to require whoever is setting this up, to have the joints straighten out beforehand. But that's really inconvenient. The other, and much better alternative, is to find the total length of the joint chain by adding the translateX values of all child joints starting with the start joint's first child all the way to the end joint. Now I said translateX because by default the x-axis is the joint's rotation axis, the one going down the joint. But what if that's not the case. Then need first a way to find the rotation axis. To do that we just need to check any of the child joint (we will use the end joint) for its translations and whichever axis has a value, that axis is the rotation axis. This is how that would look like

def getRotationAxis(joint):
    ''' Get the rotation axis from the translations in the child joint '''
    # get the translation values of the child joint    
    translate = cmds.getAttr(joint + ".t")[0]
    # to store the axis string
    axis = ""
    for i, t in enumerate(translate):
        # check which translate axis has non-zero values
        # check for + and - values. Joints could be going opposite direction
        value = abs(t)
        if value > .0001:
            if i == 0:
                axis = "x"
            elif i == 1:
                axis = "y"
            elif i == 2:
                axis = "z"
    if not axis:
         cmds.error("Child joint is too close to its parent.")
    return axis

Now, that we have a way to determine the ration axis lets use it to find the original length of our joint chain.

    rotationAxis = getRotationAxis(endJoint)

    # to store original joint chain length
    originalLength = 0.0
    
    # to store child joints
    childJoints = []

    currentJoint = startJoint
    done = False

    while not done:
        # get the child joints for the current joint
        children = cmds.listRelatives(currentJoint, c=True)
        children = cmds.ls(children, type="joint")

        # we reached the end of the joint chain
        if not children:
            done = True
        else:
            child = children[0]
            childJoints.append(child)

            # start summing the original length. Add the absolute for + and - translate values
            originalLength += fabs(cmds.getAttr(child + ".t" + rotationAxis))

            currentJoint = child
            
            # we reached the end of the stretchy joint chain
            if child == endJoint:
                done = True

Now that we have the original length we can find the stretchFactor by dividing the current distance by the  original length. We can use a 'multiplyDivide' node for this

     # divide distance by original length
    stretchFactorNode = cmds.createNode("multiplyDivide", n=ikHandle + "_stretchFactor")
    
    cmds.setAttr(stretchFactorNode + ".operation", 2) # Divide
    cmds.connectAttr(distanceNode + ".distance", stretchFactorNode + ".input1X")
    cmds.setAttr(stretchFactorNode + ".input2X", originalLength)

Now that we have a normalized distance we can use it to stretch the joints. We can stretch the joints in two different ways. We can stretch them by driving the scale or by driving the translate of the child joints. To stretch using scale we can connect the output of the multiplyDivide node (stretchFactor) to the scaleX (or whatever our rotation axis is) of all joints except the end joint.

    # connect joints to stretchy math nodes using scale
    childJoints.insert(0, startJoint)
    childJoints.remove(endJoint)

    for joint in childJoints:
        
        multiplyNode = cmds.createNode("multiplyDivide", n=joint + "_translate_stretchMultiply")
        
        cmds.setAttr(multiplyNode + ".input1X", cmds.getAttr(joint + ".t" + rotationAxis))
        cmds.connectAttr(stretchFactorNode + ".outputX", multiplyNode + ".input2X")
        cmds.connectAttr(multiplyNode + ".outputX", joint + ".t" + rotationAxis)

Nice! We are finally done setting up our stretchy joints using scale. Now lets look at how to do it for translate. The idea is the same, but with translate we want to multiply the joint's original translate by our stretchFactor instead of just plugging it in. We will do this for all joints except the first the start joint. So lets do that.

    # connect joints to stretchy math nodes using translate
    for joint in childJoints:
        
        multiplyNode = cmds.createNode("multiplyDivide", n=joint + "_translate_stretchMultiply")
        
        cmds.setAttr(multiplyNode + ".input1X", cmds.getAttr(joint + ".t" + rotationAxis))
        cmds.connectAttr(stretchFactorNode + ".outputX", multiplyNode + ".input2X")
        cmds.connectAttr(multiplyNode + ".outputX", joint + ".t" + rotationAxis)

Awesome! We now have a stretchy joint chain! So now you could even add the option to the stretchyIK function to allow the user to pick between scale and translate setup. I'll set the default method to translate.

def stretchyIKChain(startJoint, endJoint, stretchMethod="translate")

So, are we done? Well, our joints certainly stretch now when we pull on the ikHandle. But what if we move the ikHandle towards the start joint. Oh-oh! That's not good. The preferred angle on the joints are neglected and we are now overriding the joints, and they are now actually squashing instead of maintaining their original length. If you want that effect, well you don't need an ikHandle in the first place. And now you know how to set it up to have stretchy joints that squash and stretch. With what you've learned here. Its really easy to create an expression to do that for us.

In fact, I might go over in another post, how to create stretchy joints using expressions. But, going back to where we were, we want to have the joints only stretch when the distance is greater than or equal to the original length. So how do we do that using utility nodes? Using a 'condition' node! Like this

    # create a condition node to allow stretching only when the distance is >= the original length
    conditionNode = cmds.createNode("condition", n=startJoint + "_condition")
 
    cmds.setAttr(conditionNode + ".operation", 3) # >=
 
    cmds.setAttr(conditionNode + ".firstTerm", originalLength)
    cmds.setAttr(conditionNode + ".colorIfTrueR", originalLength)
    cmds.connectAttr(distanceNode + ".distance", conditionNode + ".secondTerm", f=True)
    cmds.connectAttr(distanceNode + ".distance", conditionNode + ".colorIfFalseR", f=True)

Now we just need to make sure this code comes before the one where we create and hook up the 'stretchFactorNode' (multiplyDivide). And we will need to change that code for this


# divide distance by original length
    stretchFactorNode = cmds.createNode("multiplyDivide", n=ikHandle + "_stretchFactor")
    
    cmds.setAttr(stretchFactorNode + ".operation", 2) # Divide
    cmds.connectAttr(conditionNode + ".outColorR", stretchFactorNode + ".input1X")
    cmds.setAttr(stretchFactorNode + ".input2X", originalLength)
 

Great! Now we can say we are officially done! Go and create your own stretchy IK joints!

Tuesday, June 18, 2013

lpMultiShaderTool.py

The idea to put together a tool like this came from a peer of mine needing to be able to identify material assigned to components.

In this post you can see the approach taken to doing this:
http://luizmoreira2012br.blogspot.com/2013/06/finding-shader-for-face-component.html

In summary, this tool allows for the creation and interaction of shaders in both object and component level. Users can copy and transfer shaders across objects. They can also empty shaders and reassign new objects to them, as well as deleting shaders and their shading groups.

Download script here
Watch video demo here

Here are instructions on how to use the tool:

First make sure to place the script in maya/scripts directory.

In Windows it's something like this:
     C:/Program Files/Autodesk/Maya2013/Python/lib/site-packages/ 

In Mac:
     Users/yourUserName/Library/Preferences/Autodesk/maya/2013-x64/scripts/

lpMultiShaderTool v1.0- Live update of current shader

To run the tool:

import lpMultiShaderTool
reload(lpMultiShaderTool)
lpMultiShaderTool.lpMultiShaderToolUI()

1. Assign New Shader to Selected:
     Creates a new shader and shading group and connects to selected objects

2. Get Shader from Selected:
     Copies the shader assigned to the selected object and stores it. Requires that only one object is
     selected

3. Add Shader to Selected:
    Adds the current shader to the selected objects

4. Select All with Shader:
    Selects all objects in the scene with the current shader

5. Remove All from Shader:
    Empties shader, so that all objects previously shaded with it are now shaded with the default shader -
    lambert1. Doe

6. Select All in Selected Shader: NEW
    Selects all objects that have the same shader as the selected object without affecting the current
    shader.

7. Switch All in Shaders:
    Gets the shader from the selected object and assigns it to all the objects with the current shader.
    Applies the current shader to all objects with the same shader as the selected object. In other words,
    switches the objects from on shading group to the other.

8. Delete Current Shader:
    Deletes shader and shading group for the current shader, and returns all objects previously with that
    shader to the default shader: lambert1

9. Reset To Default Shader:
    Assigns the default shader to all selected objects.

Finding the shader for a face component

You can find the shader group attached to a face component using python like this:

import maya.cmds as cmds

def getFaceShader(face):  
     ''' Return the shading group for the given face or None '''  
     # get all shading groups  
     allSG = cmds.ls(type='shadingEngine')  
     for shadingGrp in allSG:  
         # check if the face is in the set for the shading group  
         if cmds.sets(face, isMember=shadingGrp):  
             return shadingGrp  
     # no shading group was found for the face  
     return None  
To use this you need to give it a face component. For example, select a face on a polygon object and do this:
selectedFace = cmds.ls(selection=True)[0]
shadingGroup = getFaceShader(selectedFace)
After you retrieve the shading group, if you want the actual shader (ex: blinn), you just need to do:
shader = cmds.listConnections("%s.surfaceShader" % shadingGroup, source=True)
Once you've extracted the shader from a component, its really easy to transfer it over to another selected polygon or faces. You can actually do this by adding selected objects to the shading group set. If the items are in another set which is in the same partition as the given set, the items will be removed from the other set in order to keep the sets in the partition mutually exclusive with respect to membership. This is the code to do it:
selected = cmds.ls(sl=True)
if selected:
     cmds.sets(e=True, forceElement=shadingGroup)

Monday, June 17, 2013

Space Switching parts 3 and 4 are up!

Just posted the next videos in the tutorial series for Space Switching.

Part 3: https://vimeo.com/68575647

Part 4: https://vimeo.com/68580891

Read about the series here in the announcement post.
http://luizmoreira2012br.blogspot.com/2013/06/space-switching-video-series.html

Just as an update. Part 3 will be covering setting up the control attribute to switch parent spaces. Part 4 actually begins creation of the UI for the tool. Next videos will be posted very soon, stay tuned.

Hope you guys enjoy it!

Wednesday, June 12, 2013

Rigid Bodies Simulation

A small shot of a project I worked on. RnD included dynamics for rigid bodies and nParticles. Also developed pipeline tools for the project.


Watch the video @ https://vimeo.com/67760144

One of the tools developed was the lpCreateCustomTool available for download @
http://www.creativecrash.com/maya/downloads/scripts-plugins/character/c/create-custom-tool

Watch tool demo @ https://vimeo.com/66616563

Saturday, June 8, 2013

Priming and Padding explained

Priming/Padding. Why is it necessary?

Visually and technically, padding refers to creating a group node above the object in question, and priming is creating a group above the object in question that is aligned (same pivot and orientation) as another object it is meant to control.

Why these may be necessary is simple.

Examples:

1. If you have a control object that is already in place and you want to make it a child of another object that is transformed, you can't simply parent the object to the other. If you do, the control object is going to inherit those initial transformations from the parent object. So what do we do. We first group the control object to itself, and now we parent that group (or pad) to the other object. In simple terms, the pad serves as a buffer, in which the transformations of the parent object go to it instead of the actual control object. As a result, we have a control object that still does what it did before, is now controlled by the parent object, but is still clean of transformations.

2. Another scenario is with constraints. With a similar idea, you want to constraint object A so that it follows object B's rotations (so an orient constraint). By simply doing an orient constraint, your now 'locking' the rotate attributes of object A, because its being driven by object B. That might not be a problem if you dont need object A's rotate to drive anything else, but its a huge problem if you do. So, we use padding again. We make object A child of an empty group and we constraint the group node to object B. Now object A is controlled by object B because its local space is determined by the group node above it. But! It is still clean. Awesome!


3. Another really awesome reason why we use padding is to allow for our rigs to be quickly repurposed, or changed. What do I mean. Say your on the job, and you've been working on this awesome rig, and its perfect, your art director loves it, but now he comes up to you and tells you we have this scene, that can only be done with this foot rig. We cant use the original foot, we're bringing in a new foot, and we need it right now. Well, if the foot chain (from ankle to toe) was all in one group (pad), that pad can be constrained to any control object, and as we talked before, the joints will be controlled by those objects through the pad above it. The pad can also be parented under the end joint of the leg (in this case) ,so the foot behaves as the continuation of the leg joint chain. Now comes the new foot. Can you already see how easy this will be? All we need to do, is get rid of the original foot (not the pad), and place the new foot root joint under the pad. And Voila! The new foot now follows the leg, and the control object's constraints still carry over into it.

Watch the video on this topic here: https://vimeo.com/67955225

Part 1 and Part 2 of space switching series is up

First two parts of the video series on space switching are now available for viewing.

Check it here:

Part 1: https://vimeo.com/67944961
Part 2: https://vimeo.com/67945607

Enjoy!

Tuesday, June 4, 2013

Space Switching Video Series

Hello everyone,

This past 2 weeks I've been hearing a lot of question about space switching, so I decided to put together a video series explaining the concept and going a little further by actually stepping through the process of how to script a tool to setup space switching for rigs and creating an animation tool to interact with that setup.

In this video series I'll go from theory to the actual step by step process, as you can watch me implementing a tool that I use with all my rigs.

As you may know, isolating movement of a body part for example, in a character rig can be very important. For example, imagine that you have a character standing facing straight ahead, if then you start to rotate the body to face the other way, the head would turn with it as well. But if you need the head to keep facing forward, you would need to isolate its rotation. The initial way to fix that, would be for the animator to counter animate the head rotating back to its default pose facing forward.

The problem with this is that any time the animator makes an adjustment, they
have to go back and fix the head again. This can become really annoying.

Thankfully we can use space switching to help us with that. Check out this video for a quick breakdown on space switching until the first video in the series is uploaded


This is what the video series will cover:

1. Introduction
- What is Space Switching
- Breakdown and examples
- Setting it up in maya

2. Automating the process
- Theory and requirements
- Recreating the process in python

3. Creating a tool
- Starting UI for tool
- Implementing functions for UI controls
- Putting it all together

4. Creating an animation tool for space switching
- Introduction
- New concepts - Space Matching
- Starting UI for animation tool
- Implementing new functionality
- Putting it all together