
In response to some questions about the stretchy IK setup I describe in this post, I will be going over extra functionality that you could add to that kind of setup to make it more robust. So, since I'll be expanding on the concepts from the other post, I suggest you just quickly go over it if your not yet familiar with this kind of setup.
Global Scale
Lets start with something simple. Allowing your rig to scale is usually a good idea. If we are using the stretchy IK as a smaller component of a rig, we need to make sure it will scale uniformly with the rest of the rig. We can start by looking at our distanceShape node. We are using distance measurements to get this setup to work, however, our translation values from joint to joint does not change when we scale the whole rig up. Therefore we need to factor in the global scale value. We do this by dividing the distance from the distanceShape node by the global scale.
We can start by creating a multiplyDivide node. Lets set the operation to divide. And next, we want to connect the distance attribute to input1X and our global scale attribute to input2X.

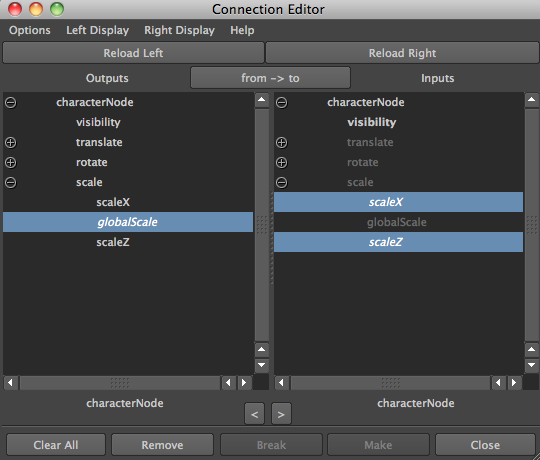
As a tip, to create and use an alias for the scale attribute on the character node that will be scaling the entire rig, you can use the following mel command,
aliasAttr globalScale characterNode.scaleY

You can then connect the other two scale attributes to the new globalScale attribute. Then you can hide them if you'd like.

Finally you can connect outputX on the multiplyDivide node to what was initially connected to the distance attribute.
Here is a script you can use to create and connect the global scale multiplyDivide node. It takes an inPlug string, an outPlugs list, and a scaleDriver string.
For example,
inPlug = 'distanceShapeNode.distance'
outPlugs = [ 'conditionNode.firstTerm', 'conditionNode.colorIfTrueR' ]
scaleDriver = 'characterNode.globalScale'
def createGlobalScaleNode(inPlug, outPlugs, scaleDriver):
    ''' Create node to allow setup to scale globally '''
    globalScaleNode = cmds.createNode("multiplyDivide")

    cmds.setAttr(globalScaleNode + ".operation", 2) # Divide
    cmds.connectAttr(inPlug, globalScaleNode + ".input1X", f=True)
    cmds.connectAttr(scaleDriver, globalScaleNode + ".input2X", f=True)

    for plug in outPlugs:
        cmds.connectAttr(globalScaleNode + ".outputX", plug, f=True)

    return globalScaleNode
Auto Stretch Toggle
With the current stretchy IK setup we are stretching it automatically. Something that's always nice to have if your automating any kind of controlled movement, is to allow the animator to turn that automation off if he chooses to. So lets go ahead and create a toggle for that.
Once again, start by creating a multiplyDivide node. This time lets leave the operation as multiply. Next we will need to create an actual attribute to toggle the stretch on and off.
Add a new attribute to the IK control node, autoStrech.

As a tip, I like to create any type of switch control as an integer instead of a boolean. The reason for this is that from experience the fact that you cannot middle mouse drag the boolean attribute to switch values can get annoying after awhile. So I prefer using an integer from 0 to 1 so you can easily scrub the value on and off. But that's up to you.
Now, we can connect the attributes. Lets go ahead and continue from where we left off in the last section.
We can connect the outputX from the global scale multiplyDivide node to input1X and then connect the autoStretch attribute on the IK control to input2X. The result of this multiplication will be either 0 or the divided distance itself. We can then pipe the outputX into the secondTerm attribute on condition node that we already had in place from the original setup. Because the condition operation is set to greater or equal, when our toggle is off, we will have original length >= 0 return True, and output the original distance, which is correct. The setup now works for when auto stretch is on or off.


As we know our IK joints can either use a Single Chain or a Rotate-Plane solver. In the case of the RP solver we can use a polevector constraint. This next setup is a nice feature to give your character rig for example if it has arms and it needs to be able to plant its elbow on something and move his forearm freely. Allowing to stretch the mid joint to the PV object can let you place the polevector ( and therefore the elbow ) wherever you wish and then animate the lower arm without affecting the upper arm.
How do you go about doing that? Well the setup is a little more intricate. That's why I'll also be going over it in this video here. Hopefully it will help you understand the setup a little better.
We will first start by creating two extra distance nodes. One from the startJoint to the polevector object (we'll call this upper distance), and another from the polevector object to the endJoint (we'll call this lower distance).

Next, lets go ahead and create on our IK control a pvStretch attribute. This time we can make it a float from 0 to 1.

Now we need to create a blendTwoAttr node. This node will allow us to blend between two attribute values. Lets start with the mid joint (in an character rig example, this would be the character's elbow joint). For the mid joint we want to blend between the stretch node and the upper distance. This means the joint will either stretch with the IK control or will stretch to meet the distance from the start joint to the pole vector object.
Note: The same rule applies here if we want to be able to make this setup scalable. We just need to divide these distances by the global scale.
The stretch node will vary depending on the stretch method you are using. If we're stretching the joints using scale then our stretch node is the stretchFactor multiplyDivide node. If translate, then our stretch node will be the stretchMultiply multiplyDivide node.
Next we need to make sure we connect our pvStretch attribute to the attributeBlender attribute on the blendTwoAttr node. Finally, we can connect the output to the joint's stretch axis. Again, this will depend on the stretch method being used and also the joint's orientation. For example, if we are stretching using translation and x is going down the joint (default), then we want to connect to the joint's translateX attribute.

Great! No we have a pvStretch attribute that allows us to stretch our mid joint to the polevector object from any position (stretched or not).
To make the setup process a little quicker, here is a little script to create and connect the blendTwoAttr node. It takes an inPlugs list, an outPlug string, and a blenderPlug string.
For example,
inPlugs = [ 'stretchFactorNode.outputX', 'upperDistanceNode.distance' ]
outPlug = 'joint.StretchAxis'
blendPlug = 'ikCtrl.pvStretch'
def createBlendAttrNode(inPlugs, outPlug, blenderPlug):
    ''' Create node to support PV stretch '''
    # create blendTwoAttr nodes
    blendAttrNode = cmds.createNode("blendTwoAttr", n="%s_blendAttr" % blenderPlug)

    # connect nodes
    for i,plug in enumerate(inPlugs):
        cmds.connectAttr(plug, blendAttrNode + ".input[%d]" % i, f=True)

    cmds.connectAttr(blenderPlug, blendAttrNode + ".attributesBlender", f=True )
    cmds.connectAttr(blendAttrNode + ".output", outPlug, f=True)

    return blendAttrNode
You can also check out the download page here, for the latest update on the stretchyIkChain tool, which incorporate these new features with a simple gui, but also allows for easy access to the backend for creating the setup from command line.


0 comments:
Post a Comment